Implementing Main View using static Java script in Openbravo

In addition to the standard UI generation framework provided by Openbravo, we can also generate our own User Interface and manage them using our own controllers or by extending the controllers provided by Openbravo. There are multiple ways of achieving this. I have provided below, one way of achieving the same, which is specially better suited when the view does not need any dynamic data.

This approach requires a javascript file and a component which can tell the javascript file path to Openbravo. For the sake of simplicity, I have done all the logic in JSP and included the JSP as the html pane in smart client. You can use your own implementation stack for the same. I have used an example module (Fugo Example – com.fugoconsulting.example(DBPrefix – FEX)) for illustrating this.

Development Steps:

Html Content:

Create a jsp file to filter all the customers and their detailed information. For example create BusinessPartner.jsp with all logic and place it in modules/com.fugoconsulting.example/web/com.fugoconsulting.example/jsp/

/**
 * JSP page to provide the List of Customers
 *
 * @author pandeeswari
 */
<%@page contentType="text/html" pageEncoding="UTF-8"%>
<%@page import="org.openbravo.model.common.businesspartner.BusinessPartner"%>
<%@page import="org.openbravo.dal.service.OBQuery"%>
<%@page import="org.openbravo.dal.service.OBDal"%>
<!DOCTYPE HTML PUBLIC "-//W3C//DTD HTML 4.01 Transitional//EN" "http://www.w3.org/TR/html4/loose.dtd">
<html>
 <style type="text/css">
 table.hovertable {
 font-family: helvetica;
 font-size:13px;
 color:#000;
 padding:5px;
 border-width: 1px;
 border-color: #a9c6c9;
 border-collapse: collapse;
 }

table.hovertable th {
 background-color:#008000;
 color:#FFF;
 padding:5px;
 font-weight:bold;
 font-family: helvetica;
 border-width: 1px;
 border-style: solid;
 border-color: #a9c6c9;
 }

table.hovertable tr {
 color:#000;
 padding:5px;
 border-width: 1px;
 border-color: #a9c6c9;
 color: #008000;
 }

table.hovertable td {
 border-width: 1px;
 border-style: solid;
 font-family: helvetica;
 border-color: #a9c6c9;
 padding:5px;
 }

 .text {
 font-family : helvetica;
 font-size:12px;
 }

 .heading {
 font-family : helvetica;
 font-size : 15px;
 font-weight : Bold;
 color: #008000;
 }
 .trwithoutbg {
 color:#333333;
 font-size:12px;
 background:#FFF;
 }
 </style>
 <meta http-equiv="Content-Type" content="text/html; charset=UTF-8">
 <title>Customer Information</title>
 <p>List of customers</p>
 <table id = "customer">
 <tr>
 <th>Name</th>
 <th>Name2</th>
 <th>Business Partner Category</th>
 <th>Price List</th>
 <th>Payment Method</th>
 <th>Payment Terms</th>
 <th>Account</th>
 <th>Invoice Terms</th>
 <th>Credit Limit</th>
 </tr>
 <%
 try {
 OBQuery<BusinessPartner> businessPartner = OBDal.getInstance().createQuery(BusinessPartner.class, "customer = 'Y'");

 for(BusinessPartner customer : businessPartner.list()) {
 String name = customer.getName();
 String name2 = "";
 if(customer.getName2() != null) {
 name2 = customer.getName2();
 }
 String businessPartnerCategory = customer.getBusinessPartnerCategory().getName();
 String priceList = "";
 if(customer.getPriceList() != null) {
 priceList = customer.getPriceList().getName();
 }
 String paymentMethod = "";
 if(customer.getPaymentMethod() != null) {
 paymentMethod = customer.getPaymentMethod().getName();
 }
 String paymentTerms = "";
 if(customer.getPaymentTerms() != null) {
 paymentTerms = customer.getPaymentTerms().getName();
 }
 String financialAccount = "";
 if(customer.getAccount() != null) {
 financialAccount = customer.getAccount().getName();
 }
 String invoiceTerms = "";
 if(customer.getInvoiceTerms() != null) {
 invoiceTerms = customer.getInvoiceTerms();
 }
 String creditLimit = customer.getCreditLimit().toString();
 %>
 <tr onmouseover="this.style.backgroundColor='#D0D0D0';" onmouseout="this.style.backgroundColor='#FFF';">
 <td><%= name %></td>
 <td><%= name2 %></td>
 <td><%= businessPartnerCategory %></td>
 <td><%= priceList %></td>
 <td><%= paymentMethod %></td>
 <td><%= paymentTerms %></td>
 <td><%= financialAccount %></td>
 <td><%= invoiceTerms %></td>
 <td><%= creditLimit %></td>
 </tr>
 <%
 }
 }
 catch(Exception e) {
 System.out.println("Error:"+e.getMessage());
 }
 %>
 </table>
 </head>
 <body>
 </body>
</html>

 Static Java Script Resource:

Create a javascript file to include the jsp so that it can be rendered as a main view in openbravo. For example, create fex-business-partner-info.js and place it in modules/com.fugoconsulting.example/web/com.fugoconsulting.example/js/ .


isc.defineClass("FEX_BusinessPartnerInfo", isc.HTMLPane).addProperties({

width: '100%',
 height: '100%',
 overflow: 'visible',

contentsType: 'page',
 contentsURL: 'web/com.fugoconsulting.example/jsp/BusinessPartner.jsp',

// allow only open one tab for this tab instance
 isSameTab: function (viewId, params) {
 return viewId === this.getClassName();
 },

getBookMarkParams: function () {
 var result = {};
 result.viewId = this.getClassName();
 result.tabTitle = this.tabTitle;
 return result;
 }
});

defineClass:

The method defineClass is a smartclient method which is used to define a new java script class. It will create a javascript class with the name “FEX_BusinessPartnerInfo” as a HtmlPane. isc.HTMLPane is the smartclient class that is extended to create the html pane. Any class of smartclient can be extended like this. You can also define your own javascript class and extend the same. For instance, you can also extend the “FEX_BusinessPartnerInfo” class.

contentsType:

The contentsType property is used to specify whether the included html should be opened as a page or a fragment. In our example, since its “Page”, it will load the html as a standalone html page.

contentsURL:

The contentsURL property  is used to specify the URL of the html page which we want to load. Since we have our jsp at com.fugoconsulting.example/jsp of our module’s web directory, we need to give the path as “web/com.fugoconsulting.example/jsp/BusinessPartner.jsp.

isSameTab:

The method isSameTab is overrided to stop Openbravo from opening many instance of the same tab again and again when the menu is clicked.

View Definition:

You can define the view as follows:

  1. Log in as System Administrator
  2. Open Application Dictionary -> User Interface -> View Definition
  3. Define the view as below.

View Definition

The name of the View Implementation must be same as the java script  class name. Since we are creating the main view using static java script, we don not need to specify the template or class implementation. Instead, to make openbravo aware of our static java script, we need to register it in a global component provider. We need to create our own component provider that will act as a common resource pool for our static resources.

Component Provider:

Create a component provider FEXComponentProvider.java and place it in the directory modules/com.fugoconsulting.example/src/com/fugoconsulting/example/ as follows.


package com.fugoconsulting.example;

import java.util.ArrayList;
import java.util.Collections;
import java.util.List;
import java.util.Map;

import javax.enterprise.context.ApplicationScoped;

import org.openbravo.client.kernel.BaseComponentProvider;
import org.openbravo.client.kernel.Component;
import org.openbravo.client.kernel.ComponentProvider;
import org.openbravo.client.kernel.KernelConstants;

/**
 * The Example module Component Provider.
 *
 * @author pandeeswari
 */
@ApplicationScoped
@ComponentProvider.Qualifier(FEXComponentProvider.QUALIFIER)
public class FEXComponentProvider extends BaseComponentProvider {
 public static final String QUALIFIER = "FEX_COMPONENTPROVIDER";

/*
 * (non-Javadoc)
 *
 * @see org.openbravo.client.kernel.ComponentProvider#getComponent(java.lang.String,
 * java.util.Map)
 */
 @Override
 public Component getComponent(String componentId, Map<String, Object> parameters) {
 throw new IllegalArgumentException("Component id " + componentId + " not supported.");
 }

@Override
 public List<ComponentResource> getGlobalComponentResources() {
 final List<ComponentResource> globalResources = new ArrayList<ComponentResource>();
 globalResources.add(createStaticResource(
 "web/com.fugoconsulting.example/js/fex-business-partner-info.js", false));
 return globalResources;
 }

@Override
 public List<String> getTestResources() {
 return Collections.emptyList();
 }
}

We should add all the static resources in the list variable globalResources.  This is done by overriding the getGlobalComponentResources() methodAt runtime, Openbravo will get the resource path from this component provider.

Now, create a menu “Customer Information” for this main view with action as “Open View in MDI”  and choose the view implementation we just created. Build the application and restart tomcat.

  1. Login as Client
  2. Choose the menu “Customer Information”
  3. Now you should be able to see the list of customers as below.

Customer Information

This example module is hosted in Openbravo forge and can be downloaded from http://forge.openbravo.com/projects/fugoexamplesmodule

Using Business Event Handlers in Openbravo

All current technologies supports multiple layers in the Application thereby enabling us the advantage and flexibility to separate the Application layer from the Business Layer and similarly separating the Business layer from the Database Layer. Openbravo is built on a MVC Architecture that enables us to separate the data layer, the logic layer and the application layer. But do we use it to the fullest extent? In most of the current solutions, the business logic is done database dependently in Triggers and Procedures. Openbravo has provided an efficient alternate to remove this database dependency.

Business event handler is an efficient alternative to database triggers.Since the business event handlers are written using DAL, it has all the advantages of using DAL and also it becomes database independent. The business event handler gets triggered whenever save, update and delete operations are performed. The event gets triggered even before the object gets into the database because of which the changes will be committed as a single transaction with all our business logics. The DAL layer uses clean and readable coding which can be used in business event handler. The business event handler uses Weld framework which will automatically detect the all the business event handlers through the using the annotation. This makes very easy for the developers to create the business event handler in a few minutes. Its enough if we just create a DAL file which extends the class EntityPersistenceEventObserver.

package org.openbravo.erpCommon.businessHandler;
import javax.enterprise.event.Observes;
import org.apache.log4j.Logger;
import org.openbravo.base.model.Entity;
import org.openbravo.base.model.ModelProvider;
import org.openbravo.base.model.Property;
import org.openbravo.model.common.businesspartner.BusinessPartner;
import org.openbravo.client.kernel.event.EntityDeleteEvent;
import org.openbravo.client.kernel.event.EntityNewEvent;
import org.openbravo.client.kernel.event.EntityPersistenceEventObserver;
import org.openbravo.client.kernel.event.EntityUpdateEvent;
/**
* Listens to events on the {@link BusinessPartnerHandler} entity.
*
* @author Pandeeswari
*/
public class BusinessPartnerHandler extends EntityPersistenceEventObserver {
private static Entity[] entities = { ModelProvider.getInstance().getEntity(BusinessPartnerHandler.ENTITY_NAME) };
private static Logger log = Logger.getLogger(BusinessPartnerHandler.class);
@Override
protected Entity[] getObservedEntities() {
return entities;
}
public void onUpdate(@Observes
EntityUpdateEvent event) {
if (!isValidEvent(event)) {
return;
}
final Entity businessPartnerEntity = ModelProvider.getInstance().getEntity(BusinessPartner.ENTITY_NAME);
String searchKey = ((BusinessPartner) event.getTargetInstance()).getSearchKey();
String name = ((BusinessPartner) event.getTargetInstance()).getName();
final Property name2Property = businessPartnerEntity.getProperty(BusinessPartner.PROPERTY_NAME2);
event.setCurrentState(name2Property, searchKey + " - " + name);
}
public void onSave(@Observes
EntityNewEvent event) {
if (!isValidEvent(event)) {
return;
}
final Entity businessPartnerEntity = ModelProvider.getInstance().getEntity(BusinessPartner.ENTITY_NAME);
String searchKey = ((BusinessPartner) event.getTargetInstance()).getSearchKey();
String name = ((BusinessPartner) event.getTargetInstance()).getName();
final Property name2Property = businessPartnerEntity.getProperty(BusinessPartner.PROPERTY_NAME2);
event.setCurrentState(name2Property, searchKey + " - " + name);
}
public void onDelete(@Observes
EntityDeleteEvent event) {
if (!isValidEvent(event)) {
return;
}
}
}

The above program appends the searchkey and name of the business partner and updates in the name2 field in business partner whenever the value is inserted or updated. Whenever an action is performed, the getObservedEntities() Method will be called which will return the array of entities that are being observed. In short, it will give the array of entities that has business event handlers. This entity array is used to check if a certain event is targeted for this observer. Say if an entity is being updated. The getObservedEntities() method will give all the observed entities and the method isValidEvent will check whether the entity is an observed entity. If the target entity exists in the list of observed entity, then it will return true. Also the event is automatically captured by @Observes and routed correspondingly to any of the methods onUpdate, onSave, onDelete.

The old and new values of a field can be accessed using OLD and NEW Identifier in database triggers. This can be done in business event handlers using the methods, getPreviousState and getCurrentState method. The method getCurrentState will be available in all the 3 classes EntityUpdateEvent, EntityNewEvent and EntityDeleteEvent whereas the getPreviousState method will be available only in EntityUpdateEvent class. This makes sense because we can get the previous state(old values) only when the record is being updated. Similarly, we can set a new value to a property(field) using the method setCurrentState which will be available in all the 3 classes. Though it is available in all the 3 classes, it is applicable only for new and update event.

final Property name2Property = businessPartnerEntity.getProperty(BusinessPartner.PROPERTY_NAME2);
Object previousName = event.getPreviousState(name2Property);
Object currentName = event.getCurrentState(name2Property);

When we want to interrupt certain event, we can throw an exception as we raise exception in database triggers. It can be done as follows,

public void onSave(@Observes EntityNewEvent event) {
if (!isValidEvent(event)) {
return;
}
final Entity businessPartnerEntity = ModelProvider.getInstance().getEntity(BusinessPartner.ENTITY_NAME);
String searchKey = ((BusinessPartner) event.getTargetInstance()).getSearchKey();
String name = ((BusinessPartner) event.getTargetInstance()).getName();
if(searchKey != null && name != null) {
final Property name2Property = businessPartnerEntity.getProperty(BusinessPartner.PROPERTY_NAME2);
event.setCurrentState(name2Property, searchKey + " - " + name);
}
else {
String language = OBContext.getOBContext().getLanguage().getLanguage();
ConnectionProvider conn = new DalConnectionProvider(false);
throw new OBException(Utility.messageBD(conn, "C_NullValue", language));
}
}

Leave in your comments about your views on implementing business logics at the database level or at the DAL layer.

Passing Parameters to Stored Procedures in Openbravo

Stored procedures in Openbravo enables us to add business logic to the Application. Whenever some business logic is applied, it is applied based upon certain arguments or parameters. I have presented below, using a simple example, how to use parameters in Stored Procedures in Openbravo.

Consider the process “xyz_update_product_category”. This process just updates the products of a particular category to another new category. In order to achieve this we need two parameters, ‘new_product_category’ and the ‘current_product_category’. When we pass the parameters to stored procedure from the Application Dictionary, it will be bundled in ‘Process Instance Id’ and sent to the procedure. So we need to get the parameter values through the Process Instance which will be there in ad_pinstance table.

The procedure must be as follows.

CREATE OR REPLACE FUNCTION xyz_update_product_category(p_pinstance_id character varying)
RETURNS void AS
$BODY$ DECLARE

-- Logistice
v_ResultStr VARCHAR(2000):=''; --OBTG:VARCHAR2--
v_Message VARCHAR(2000):=''; --OBTG:VARCHAR2--
v_Result NUMERIC:=1; -- 0=failure
v_NewProductCategory VARCHAR(32); --OBTG:VARCHAR2--
v_CurrentProductCategory VARCHAR(32); --OBTG:VARCHAR2--

--TYPE RECORD IS REFCURSOR;
Cur_Parameter RECORD;

BEGIN
RAISE NOTICE '%','Updating PInstance - Processing ' || p_PInstance_ID ;
v_ResultStr:='PInstanceNotFound';
PERFORM AD_UPDATE_PINSTANCE(p_PInstance_ID, NULL, 'Y', NULL, NULL) ;
BEGIN
-- Get Parameters
v_ResultStr:='ReadingParameters';
FOR Cur_Parameter IN
(SELECT p.ParameterName, p.P_String, p.P_Number, p.P_Date
FROM AD_PInstance i
LEFT JOIN AD_PInstance_Para p
ON i.AD_PInstance_ID=p.AD_PInstance_ID
WHERE i.AD_PInstance_ID=p_PInstance_ID
ORDER BY p.SeqNo
)
LOOP
IF(Cur_Parameter.ParameterName='new_product_category') THEN
v_NewProductCategory:=Cur_Parameter.P_String;
RAISE NOTICE '%','  New Product Category=' || v_NewProductCategory ;
ELSIF(Cur_Parameter.ParameterName='current_product_category') THEN
v_CurrentProductCategory:=Cur_Parameter.P_String;
RAISE NOTICE '%','  Current Product Category=' || v_CurrentProductCategory ;
ELSE
RAISE NOTICE '%','*** Unknown Parameter=' || Cur_Parameter.ParameterName ;
END IF;
END LOOP; -- Get Parameter

-- Updates the Product with new Product Category
UPDATE m_product
SET m_product_category_id = v_NewProductCategory
WHERE m_product_category_id = v_CurrentProductCategory;

IF(p_PInstance_ID IS NOT NULL) THEN
--  Update AD_PInstance
RAISE NOTICE '%','Updating PInstance - Finished ' || v_Message ;
PERFORM AD_UPDATE_PINSTANCE(p_PInstance_ID, NULL, 'N', v_Result, v_Message) ;
ELSE
RAISE NOTICE '%','Finished ' || v_Message ;
END IF;

EXCEPTION
WHEN OTHERS THEN
v_ResultStr:= '@ERROR=' || SQLERRM;
RAISE NOTICE '%',v_ResultStr ;
-- ROLLBACK;
IF(p_PInstance_ID IS NOT NULL) THEN
PERFORM AD_UPDATE_PINSTANCE(p_PInstance_ID, NULL, 'N', 0, v_ResultStr) ;
END IF;
END;
END ; $BODY$
LANGUAGE 'plpgsql' VOLATILE
COST 100;

After creating the process, it should be defined in the Application Dictionary. The process definition for this process (in Application Dictionary->Reports and Process) is as follows.

This process takes two parameter one for specifying the current product category and other one to specify the new product category that is to be assigned.  These parameters must be defined in Parameters tab of the Application Dictionary->Reports and Process window under the corresponding process. These parameter definition must be as follows.

Note the DB Column Name for the above two parameters. These are the names that should be used in the procedure to get the values of the parameters.

FOR Cur_Parameter IN
(SELECT p.ParameterName, p.P_String, p.P_Number, p.P_Date
FROM AD_PInstance i
LEFT JOIN AD_PInstance_Para p
ON i.AD_PInstance_ID=p.AD_PInstance_ID
WHERE i.AD_PInstance_ID=p_PInstance_ID
ORDER BY p.SeqNo
)
LOOP
IF(Cur_Parameter.ParameterName='<strong>new_product_category</strong>') THEN
v_NewProductCategory:=Cur_Parameter.P_String;
RAISE NOTICE '%','  New Product Category=' || v_NewProductCategory ;
ELSIF(Cur_Parameter.ParameterName='<strong>current_product_category</strong>') THEN
v_CurrentProductCategory:=Cur_Parameter.P_String;
RAISE NOTICE '%','  Current Product Category=' || v_CurrentProductCategory ;
ELSE
RAISE NOTICE '%','*** Unknown Parameter=' || Cur_Parameter.ParameterName ;
END IF;
END LOOP; -- Get Parameter

Depending on the data type of the parameter, we can use P_String, P_Number, P_Date columns of the ad_pinstance table to get the values. In our example, since the two parameters are of string data type, we have used v_NewProductCategory:=Cur_Parameter.P_String and v_CurrentProductCategory:=Cur_Parameter.P_String.

As this process is used for bulk update, it cannot be defined as a button in the window. So define it as a separate process and create a menu.

After completing all these steps compile the application and deploy it to see the output.

Process window:

If you click on the menu which we created, it will show up a pop up window as below.

Here we have chose the Current Product Category as ‘Alcoholic’ and the New Product Category as ‘Fruit Juice’. So this process will update all the product which has the product category as ‘Alcoholic’ to ‘Fruit Juice’.

Here you can see the output of this process:

Before executing the process:

After executing the process:

Though I have presented the logic using Stored Procedures, it is better to go for DAL process to add your business logic. For more information on how to pass arguments for DAL Processes refer here. For simple how-to on writing a DAL process, refer here.

Sub-Reports in Openbravo

Report is one of the key USP for any ERP application. The more enhanced and flexible the reports are, more happy is the customer. In Openbravo, jasper reports provides us the flexibility to handle all this. iReport is one  tool that can be used to create jasper reports. I have provided a simple example of how to add sub-report for an Openbravo Report using iReport.

Main Report:

Assume we have created a main report with the following query and layout.

Adding Sub Report:

The Sub Report can be created by adding the sub report icon as follows.

The sub-report can be added by drag and dropping the highlighted portion in the above screen shot. It will open the sub report wizard.

The sub report can be created in any one of the following three ways. Each way has different number of configuration steps.

1. A new sub report can be created using the wizard by using the “Create a new Report” Option. This will ask for all the options needed to create a new report including the report query. This will go through all the 7 steps.

The Sub Report expression can be any one of the following two options.

1. Through SUBREPORT_DIR Parameter

This will create a parameter SUBREPORT_DIR in Main Report. We have to point this parameter to the folder containing the sub report.

2. Through absolute path.

2. We can also call a already existing report as a sub report. This can be done by “Use an existing Report”  option. We have to provide the path of the existing report. This will directly go to step 6 skipping the steps before that.

3. The last option will just create a blank sub report.

Adding Parameter:

In the Report Properties window, there is an option called parameter. This option enables us to add the parameter for that particular report.

Any number of parameters can be provided to the report through this option.

Sub Report Query:

Note that you can see the parameter in the available parameters list in the above screen shot. We can also add the parameter through the “New Parameter” button in the above screen shot.

Importing Report in Openbravo:

For importing the report into openbravo,  the jrxml files should be placed inside your module. For instance, if your module is XYZ with the Java Package com.fugoconsulting.XYZ, then the jrxml file should be inside the folder modules/com.fugoconsulting.XYZ/src/com/fugoconsulting/XYZ/erpReports/.  Before importing the report into openbravo, we need to give the relative path for the sub-report and the images that  we have added. This will make the report work in all systems irrespective of the path of the report. In order to give relative path, you need to add the following two parameters in main report.

1. BASE_DESIGN:

This parameter will be resolved at run time and will be pointing to your module folder(In our case modules/com.fugoconsulting.XYZ/src). The sub report expression must be modified as follows. This can be modified using the property “Sub report Expression”.

2. BASE_WEB:

This parameter will be resolved to point the web folder at run time. This parameter is used to give the relative path for images. The sub report expression must be modified as follows.

Registering in Reports and Process:

Create menu and compile the application. The output will be,

For creating charts using iReport refer here.

Reference Types in Openbravo

Reference is the way a field or column is presented to the User. For the list of references supported by Openbravo, refer here. These are mainly bundled inside the WAD. I have presented a basic overview of few references that could be of more use.

Amount:

This reference is used when we want to represent currency values. Different countries will have different currency representations. For instance, Indian representation of currency will have two decimal places. This can be configured in format.xml file. Once this is configured, the decimal places will be globally affected for all the amount fields.

Price:

Price and Amount references are almost same. Only difference is we cannot give the minimum and maximum range for the field when it is Price References.

Button:

Button Reference is used when we want to execute a process. Either a Dal process or a stored procedure can be attached to a button. This can be done by defining the process in Reports and Process.

DateTime:

DateTime reference is used to capture the time in hh:mm:ss format. The validation for hours,minutes and seconds are already done in the reference.

ID:

ID refers to the primary key field of the Table. This is set up by Openbravo. It uses the Tablename_ID notation to find out what is the primary key for the table.

Image:

Images are saved in the AD_Image table in Openbravo. You can refer to the Images saved there, as a dropdown field here. i.e only the name of the image will come in the dropdown.

ImageBLOB:

When you want to display an image in a field, this datatype is used. For more information on setting Images in Openbravo, refer here. The images will be displayed as follows.

Link:

The Link reference is used when you want to refer to an external link from Openbravo, or to any link within Openbravo. You can navigate to the link using the button provided at the end of the field.

List:

Presents a list of predefined values as a dropdown. This list can be configured in the Reference Window using the System Administrator role.

TableDir:

TableDir is the abbreviation for TableDirect. In essence, it points out to the foreign key referenced here. For eg., if you refer a field called ad_image_id, Openbravo identifies by itself that there is a table by the name ad_image and pulls all the values of that table and provides as a dropdown in this field. The values that appears in the dropdown is the field that was set as identifier in that Table. Note that, the field name has to be the exact primary column name of the referenced table. There is a small issue with regards to this, which is discussed here.

Table:

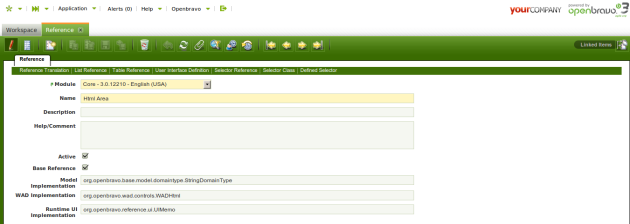
Table reference is similar to TableDir, but here the name of the referenced field need not be the same as the corresponding ID field of the referred Table. Also in some cases using Table references allows us to add extra filtering conditions to the column. A table reference created for Client is provided below. Even this is configured in the reference window using the System Administrator role.

We can also add our own references in addition to the references provided. Some examples are presented here and here.

Would be happy to hear comments and questions.

HTMLArea in Openbravo

References are a key feature that one should be aware of in OpenbravoERP. References provides us options to change the way a field is displayed in the Application. There are many standard reference types like, Table, TableDir, Date, Integer, ImageBlob, etc. These are mainly bundled inside the WAD. In addition to the existing list of references listed here, one can add more references like RadioButton, FileDialog, etc. For more information on how to extend a base reference to your module, refer here.

HtmlArea Reference:

The use of this reference type  it to display the value based on the html code provided. It can be used in many scenarios. I have provided a basic few scenarios here.

  • To display different colour on the field based on the condition.
  • To display remote content in the field.
  • To embed HTML code available elsewhere.
  • Used when you want to have a link to any other openbravo window or process. This is can done by using <a href=”link”/> where link is the url of that corresponding window or process.
  • For simple formatting like Font Color, Background Image, etc.

To achieve this, you can type a HTML code for that and save it in the default value of  the Column in ‘Tables and Columns’ so it at run type, it will display the colour. The definition should be as follows.

HtmlAreaDefinition

Html Area Definition

Compile the application and the output will be as follows.

Output

Output

Steps:

Add the following files in Openbravo-Source/src-wad/src/org/openbravo/wad/controls

1. WADHtml.html


<?xml version="1.0" encoding="UTF-8" ?>
<!--
*************************************************************************
@author Pandeeswari
*************************************************************************
-->
<html xmlns="http://www.w3.org/1999/xhtml" xml:lang="en" lang="en">
<head>
<script type="text/javascript">
function DisplayHtml(/*String */ id) {
var htmlValue = document.getElementById(id);
var displayText = document.getElementById('yy');
displayText.innerHTML = htmlValue.value;
htmlValue.style.display = 'none';
}
</script>
</head>
<body>
<FIELD_TMP>
<div id="xx_inp">
<table border="0" cellpadding="0" cellspacing="0">
<tr>
<td>
<table style="border:0px;border-collapse:collapse;">
<tr>
<td style="padding-top: 0px;">
<textarea id="xx" required="false" maxlength='xx' name="inpxx" onkeyup="" onkeydown="changeToEditingMode('onkeydown');" onkeypress="changeToEditingMode('onkeypress');" oncut="changeToEditingMode('oncut');" onpaste="changeToEditingMode('onpaste');" oncontextmenu="changeToEditingMode('oncontextmenu');" onchange="validateTextArea(this.id);logChanges(this);xx();return true;" onfocus="DisplayHtml(this.id);"></textarea>
<b id="yy" required="false" maxlength='xx' onkeyup="" onkeydown="" onkeypress="" oncut="" onpaste="" oncontextmenu="" onchange=""></b>
</td>
</tr>
</table>
<span style="display: none;" id="xxmissingSpan">
<table>
<tr>
<td><div /></td><td></td>
</tr>
<tr>
<td colspan="2" class='missing'><div id="xxmissingSpanText" name="missingText">xx</div></td>
</tr>
</table>
</span>
</td>
</tr>
</table>
</div>
</FIELD_TMP>
</body>
</html>

2. WADHtml.java


/*
*************************************************************************
@author Pandeeswari
*************************************************************************
*/
package org.openbravo.wad.controls;

import java.io.IOException;
import java.util.Properties;
import java.util.Vector;

import javax.servlet.ServletException;

import org.openbravo.wad.EditionFieldsData;
import org.openbravo.wad.FieldsData;
import org.openbravo.wad.WadUtility;
import org.openbravo.xmlEngine.XmlDocument;

public class WADHtml extends WADControl {

public WADHtml() {
}

public WADHtml(Properties prop) {
setInfo(prop);
initialize();
}

public void initialize() {
generateJSCode();
}

private void generateJSCode() {
addImport("ValidationTextArea", "../../../../../web/js/default/ValidationTextArea.js");
if (getData("IsMandatory").equals("Y")) {
XmlDocument xmlDocument = getReportEngine().readXmlTemplate(
"org/openbravo/wad/controls/WADMemoJSValidation").createXmlDocument();

xmlDocument.setParameter("columnNameInp", getData("ColumnNameInp"));
setValidation(replaceHTML(xmlDocument.print()));
}
setCalloutJS();
}

public String getType() {
return "TextArea";
}

public String editMode() {
double rowLength = ((Integer.valueOf(getData("FieldLength")).intValue() * 20) / 4000);
if (rowLength < 3.0)
rowLength = 3.0;
XmlDocument xmlDocument = getReportEngine().readXmlTemplate(
"org/openbravo/wad/controls/WADHtml").createXmlDocument();

xmlDocument.setParameter("columnName", getData("ColumnName"));
xmlDocument.setParameter("columnNameInp", getData("ColumnNameInp"));
xmlDocument.setParameter("size", getData("CssSize"));
xmlDocument.setParameter("maxlength", getData("FieldLength"));

boolean isDisabled = (getData("IsReadOnly").equals("Y") || getData("IsReadOnlyTab").equals("Y") || getData(
"IsUpdateable").equals("N"));
xmlDocument.setParameter("disabled", (isDisabled ? "Y" : "N"));
if (!isDisabled && getData("IsMandatory").equals("Y")) {
xmlDocument.setParameter("required", "true");
xmlDocument.setParameter("requiredClass", " required");
} else {
xmlDocument.setParameter("required", "false");
xmlDocument.setParameter("requiredClass", (isDisabled ? " readonly" : ""));
}

xmlDocument.setParameter("callout", getOnChangeCode());

return replaceHTML(xmlDocument.print());
}

public String newMode() {
double rowLength = ((Integer.valueOf(getData("FieldLength")).intValue() * 20) / 4000);
if (rowLength < 3.0)
rowLength = 3.0;
XmlDocument xmlDocument = getReportEngine().readXmlTemplate(
"org/openbravo/wad/controls/WADHtml").createXmlDocument();

xmlDocument.setParameter("columnName", getData("ColumnName"));
xmlDocument.setParameter("columnNameInp", getData("ColumnNameInp"));
xmlDocument.setParameter("size", getData("CssSize"));
xmlDocument.setParameter("maxlength", getData("FieldLength"));

boolean isDisabled = (getData("IsReadOnly").equals("Y") || getData("IsReadOnlyTab").equals("Y"));
xmlDocument.setParameter("disabled", (isDisabled ? "Y" : "N"));
if (!isDisabled && getData("IsMandatory").equals("Y")) {
xmlDocument.setParameter("required", "true");
xmlDocument.setParameter("requiredClass", " required");
} else {
xmlDocument.setParameter("required", "false");
xmlDocument.setParameter("requiredClass", (isDisabled ? " readonly" : ""));
}

xmlDocument.setParameter("callout", getOnChangeCode());

return replaceHTML(xmlDocument.print());
}

public String toXml() {
String[] discard = { "xx_PARAM", "xx_PARAMHIDDEN", "xx_HIDDEN" };
if (getData("IsDisplayed").equals("N")) {
if (getData("IsParameter").equals("Y"))
discard[1] = "xx";
else
discard[2] = "xx";
} else {
if (getData("IsParameter").equals("Y"))
discard[0] = "xx";
}
XmlDocument xmlDocument = getReportEngine().readXmlTemplate(
"org/openbravo/wad/controls/WADMemoXML", discard).createXmlDocument();
xmlDocument.setParameter("columnName", getData("ColumnName"));
return replaceHTML(xmlDocument.print());
}

public String toJava() {
return "";
}

public void processTable(String strTab, Vector<Object> vecFields, Vector<Object> vecTables,
Vector<Object> vecWhere, Vector<Object> vecOrder, Vector<Object> vecParameters,
String tableName, Vector<Object> vecTableParameters, FieldsData field,
Vector<String> vecFieldParameters, Vector<Object> vecCounters) throws ServletException,
IOException {
// Override this to do nothing
}
}

3. WADHtml.xml

<?xml version="1.0" encoding="UTF-8"?>
<!--
*************************************************************************
@author Pandeeswari
*************************************************************************
-->
<REPORT>
<template file="WADHtml.html"/>
<PARAMETER id="paramChecked" name="checked" default="Y"/>

<PARAMETER id="xx_inp" name="columnName" attribute="id" replace="xx"/>
<PARAMETER id="xx" name="columnName" attribute="id"/>
<PARAMETER id="xx" name="columnNameInp" attribute="name" replace="xx"/>
<PARAMETER id="xx" name="size" attribute="class" replace="yy"/>
<PARAMETER id="xx" name="callout" attribute="onchange" replace="xx();"/>
<PARAMETER id="xx" name="maxlength" attribute="maxlength"/>
<PARAMETER id="xx" name="disabled" boolean="readonly=true" withId="paramChecked"/>
<PARAMETER id="xx" name="required" attribute="required"/>
<PARAMETER id="xx" name="requiredClass" attribute="class" replace="xx"/>
<PARAMETER id="xxmissingSpan" name="columnName" attribute="id" replace="xx"/>
<PARAMETER id="xxmissingSpanText" name="columnName" attribute="id" replace="xx"/>

<DISCARD id="discard"/>
</REPORT>

Using the above code, create the reference as follows.

Reference Definition

Reference Definition

Specify the reference type as Html Area in columns for the desired column(It should be character varying in Database). Give the html code and compile. Then when you open the window in classic mode, and based upon the code provided in HTML, the value will be displayed. There are some points to be noted here.

  • This reference type works currently in Classic mode.
  • In the form view, the HTML output gets displayed, but in the Grid view, the HTML code gets displayed.
  • Only if the corresponding field is the First field in the page or the first focussed field, then HTML output gets displayed. Or else the HTML code alone appears and once the focus is changed from that field, the HTML output appears as I have written the function in the onblur event.
  • The same code can be extended to support scripts and also Data Operations.
Comments and suggestions are very much welcome.

Creating Charts in Openbravo Reports

Reporting is a decisive factor that determines the reach of an ERP among the Users. OpenbravoERP in particular have laid a lot of emphasis on the reporting structures. iReport is the tool officially supported by Openbravo for generating reports within Openbravo.

iReport is an opensource java based reporting tool. iReport provides lots of features like sub-reports,crosstab references, and various presentation gadgets like charts, bar graph, plotted line, etc. I have provided the steps for creating charts in reports in Openbravo.For basic on developing reports in iReport, refer here. You can download iReport here.

Lets see an example. I have 10 product categories and 500 products. I want to see which products fall under which category and how much is the stock available. Lets see how this could look.

 If you have not worked in iReports before, you can take a look at this. You can download iReport here. To add a chart to a window, use the chart tool icon in the interface. A screen shot of where it is located is provided below:

Once you have added the chart, you can access the chart properties as provided in the below screen shot.

In the chart properties, go to chart data -> details. Here you can add the categories based upon which you want the data. Here I have added the category as product Category and the series values in terms of the products in that particular category. Here the following key points to be noted are:

1. Series Expression:

This represents the bars that appears on the chart. Here we want all the products with the count. so we choose the products here

2. Category Expression:

This represents the  x-axis. Here the product category is our base and we provide that here.

3. Value Expression:

Value is nothing but the quantity that determines the height of the bars in the report. Here we are providing the count of each product.

4. Label Expression (optional) :

This provides the additional information about the bars in the chart that is provided under the chart. If its left empty, the name from the value expression will be pulled up.

Once all this is done, refer to the steps to import the same in the Openbravo Application and if you run the report, you will get the following output.

Having presented all this, generating reports in this format is really helpful. However Openbravo has now become the agile, tamed ERP…:). There is a new and powerful feature widgets.

Understanding OBDal in Openbravo

OBDal is an extensively used class in Openbravo. If offers lots of useful functions to enable external access to the Data Access Layer. OBDal provides the basic functions like insert,save,remove, etc. OBDal forms the base for the Data Access Layer(DAL) in Openbravo.

DAL Architecture

Though there are lots of useful functions in OBDal, we often use only few basic functions like save, remove, etc. Lets see the use of  the methods in OBDal and its usage.

1. void commitAndClose():

This function commits the transaction and closes the transaction. It will not only commit the current transaction but all the pending transactions. However, having more than one open transactions at a time is not advisable. There are few reasons why we should not have more than one open transactions. One of the reason is, if one of the open transactions failed to commit, all the pending transactions will be rolled back. This can be used in the code as follows.

OBDal.getInstance().commitAndClose();

There may be situations where we still need the transaction but just commit it. But when we use this method, it will not only commit but also closes the transaction. In this scenario, we can make use of the class SessionHandler( This class is exclusively for maintaining hibernate session for transactions). This class has a method commitAndStart(). This method will commit the transaction and starts a new session. This can be used in the code as follows.

SessionHandler.getInstance().commitAndStart();

2. void rollbackAndClose()

This method is used to rollback the transaction. Similar to commitAndClose() Method, this method will rollback all the open transactions.

OBDal.getInstance().rollbackAndClose();

The SessionHandler has a method rollback() which can be used when we don’t want to close the session but rollback the transaction.

SessionHandler.getInstance().rollback();

The SessionHandler class has two other methods that enables us to mark the transactions that needs to be rolled back. This can be done using the method, void setDoRollback(boolean). If the argument is true, then the transaction will be marked for rollback and if it is false, the transaction will not be marked for rollback. The other method is boolean getDoRollback() which will return whether the transaction is marked for rollback or not.

 SessionHandler.getInstance().setDoRollback(true);
 SessionHandler.getInstance().getDoRollback();

3. void disableActiveFilter() and void enableActiveFilter()

By default, the active filters will be enabled. Consider the line below.

Client clientList = OBDal.getInstance().get(Client.class,null); //Client is the class which we are referring and null denotes there is no filter

This will return all the records in ad_client  table that are active. We can disable this by using the method disableActiveFilter(). After disabling, the above line will return all the records irrespective of either the record is active or not. enableActiveFilter() is used to enable the filter. This methods can be used as follows.

OBDal.getInstance().disableActiveFilter();
 OBQuery<Client> clientList = OBDal.getInstance().createQuery(Client.class,null);
 for(Client client : clientList.list()) {
 //Processing
 }
 OBDal.getIstance().enableActiveFilter();

4. boolean isActiveFilterEnabled()

This method is used to verify whether the active filter is enabled or not. At any point of time, the active filter can be enabled and disabled and this method is useful to verify the status.

if(OBDal.getInstance().isActiveFilterEnabled()) {
 OBDal.getInstance().disableActiveFilter();
 }

5. boolean exists(String entityName, Object id)

This method is used to check whether a particular record exists in the database.

 OBDal.getInstance().exists(ADClient.ENTITY_NAME,"0");//ADClient is the entity name for Client Class and "0" refers to ad_client_id

To understand the use of this method, consider the code below.

Client clientList = OBDal.getInstance().get(Client.class,"45");
 try {
 String name = clientList.getName();
 } catch(Exception e) {
 log.info(e.getMessage());
 }

In the above code, if the record with ad_client_id = “45” doesn’t exists, it will throw java.lang.NullPointerException since we are trying to access the value(clientList.getName()). To avoid this, we can use exists() method as follows.

Client clientList = OBDal.getInstance().get(Client.class,"45");
 if(clientList.getInstance().exists(ADClient,"45"))  {
 try {
 String name = clientList.getName();
 } catch(Exception e) {
 log.info(e.getMessage());
 }

The above code will be executed only if the record is present in the database.

6. String getReadableClientsInClause() & String getReadableOrganizationsInClause()

This method returns an in-clause string of the clients that are readable by the current user. The In-Clause String looks like (“0″,”1000000”). This method is useful in many scenarios. Below is one such scenario.

While retrieving the records using OBDal, it will automatically take care of the security. However, when we use HQL Queries, we need to take care of the security. In order to retrieve the client and organization readable by the user, we can use this method.

For example,

String hql = "SELECT name  "
 +"FROM ADRole r"
 +"WHERE r.organization IN "+OBDal.getInstance().getReadableOrganizationsInClause()
 +" AND r.client IN "+OBDal.getInstance().getReadableClientsInClause()
 +" AND r.active=true ";
 Query query = OBDal.getInstance().getSession().createQuery(hql);

This query will return the name of the roles that are readable for the current user.

These are few methods that I felt important in OBDal that would ease development using DAL. For details on how to write DAL code, refer ([1] and  [2]).

Tree Structure for Custom Windows in Openbravo

Generating Tree Structure is a great innovative feature that is present in OpenbravoERP. If you are wondering what it looks like, refer to Organization window in the Client Mode or the Menu Window in System Admin mode. There will be an icon called Tree in the Toolbar. Click on that and you will see something similar to the screen shot below.For more information, refer here.

This functionality will find its use in most places where there is a hierarchy to be shown and segregations are to be visualized. One more appreciable feature is that you can drag and drop the items and rearrange it. Doesn’t it sound really cool to you? I was really excited to test this out for the custom windows and with the help of Wiki, Forge and of course my colleague, I was able to create a tree similar to the one shown above for a custom window called ‘Department’. I have attached a screen shot of my tree below.

This feature is really helpful in lot of cases. I have shared the sequence of steps that I followed that enabled me to create such a structure. We have categorized the steps that we performed into 3 sections:

1. Database changes

2. Changes to be done in the Application

3. Changes to be done in code

1. Database Changes

  • Create a new table for the department. Eg: XYZ_department.

The following are the key fields in the table.

        "value" character varying(40) NOT NULL,
        "name" character varying(60) NOT NULL,
        description character varying(255),
        issummary character(1) NOT NULL DEFAULT 'N'::bpchar,
  •  Create a new table for storing the tree nodes. Eg: XYZ_treenodedp (Structure similar to ad_treenode table)
  • Add logic in the Department Table Trigger to insert values in XYZ_treenodedp and the corresponding delete logic also. Refer Organisation table trigger for more information.
  • Add a new column in ad_clientinfo. Eg: em_XYZ_tree_department

2. Changes to be done in the Application

  • Create Window for the Department. Set the field ‘Tree Included’ to Yes in Fields Tab. Eg: In Department window
  • Import the  corresponding column created in ad_clientinfo table into the Application.
  • Add a new entry in the list reference ad_treetype. Eg: Search key: XYZ_DP Name: Department
  • Create a new entry in Tree and Node Image window both in System administrator and desired client admin. Eg. Name: Primary Department Tree type: Department in System Administrator and Name: F&B International Admin Department Tree Type: Department in F&B International Admin.

  • Update and set the value for the em_XYZ_tree_department field as the client’s tree entry. Eg: In F&B International Admin, Set the value as ‘F&B International Admin Department.

PrimaryDepartment

3. Changes to be done in code

  • In WindowTreeUtility.java, add the following lines in checkSpecificChanges() Method.
else if (TreeType.equals("XYZ_DP")) { //Department
 result = "";
 }

  • In WindowTreeUtility.java, add the following lines in getTreeType() Method.

else if (keyColumnName.equals("XYZ_Department_ID"))
 TreeType = "XYZ_DP";

  •  In WindowTreeUtility.java, add the following lines in getTree() Method.

else if (TreeType.equals("XYZ_DP"))
 data = WindowTreeData.selectDepartment(conn, vars.getUser(), strEditable, strParentID,  strNodeId, TreeID);


else if (TreeType.equals("XYZ_DP"))
 WindowTreeData.updateDP(conn, vars.getUser(), strParentID, strSeqNo, TreeID, strLink);

  •  In WindowTree_data.xsql, add two new sql methods to select and update the tree nodes.

<SqlMethod name="updateDP" type="preparedStatement" return="rowCount">
 <SqlMethodComment></SqlMethodComment>
 <Sql>
 UPDATE XYZ_TREENODEDP SET UPDATED=now(), UPDATEDBY = ?,                 PARENT_id = ?, SEQNO=TO_NUMBER(?)   WHERE AD_TREE_ID = ?
 AND NODE_ID = ?
 </Sql>
 <Parameter name="updatedby"/>
 <Parameter name="parentId"/>
 <Parameter name="seqno"/>
 <Parameter name="adTreeId"/>
 <Parameter name="nodeId"/>
 </SqlMethod>

<SqlMethod name="selectDepartment" type="preparedStatement" return="multiple">
 <SqlMethodComment></SqlMethodComment>
 <Sql>
 SELECT tn.Node_ID,tn.Parent_ID,tn.SeqNo,                             m.XYZ_Department_ID AS ID, m.Name,m.Description,m.IsSummary
 FROM XYZ_TreeNodedp tn,
 XYZ_Department m
 WHERE tn.Node_ID = m.XYZ_Department_ID
 AND tn.AD_Tree_ID = ?
 ORDER BY COALESCE(tn.Parent_ID, '-1'), tn.SeqNo
 </Sql>
 <Parameter name="editable" optional="true" type="none" after="WHERE "                 text="tn.IsActive='Y' AND m.isActive='Y' AND "/>
 <Parameter name="parentId" optional="true" after="WHERE " text="tn.Parent_ID = ?             AND "/>
 <Parameter name="nodeId" optional="true" after="WHERE " text="tn.Node_ID = ?             AND "/>
 <Parameter name="adTreeId"/>
 </SqlMethod>

Purpose of Application Element in Openbravo

Hi All,

Application Element is one really cool feature in Openbravo, that I managed to get hold of after a while. I just wanted to share the importance and the influence of the application elements as it will cause lots of maintenance problems if not handled properly.

Application Element is mainly used for Re-Usability. It will actually reduce lots of our development time when handled properly. Whenever we create a new column, the synchronize terminology process will create a new application element(if it doesn’t have any element for the same column name). Thereafter whenever we create a new column with the same dbname, it will map the same application element for that column. Because of this mapping, we can manage the display name,help/comment, description globally. That is we need not go to each and every column and change the display name,help comment or description. It will be mapped globally to all columns that uses a particular column name. Web Service is one of the most important thing in openbravo. This web service will use the name which we provide as column name in column table.

A good example could be, think of the column ad_client_id. We should use that field in all tables. Just think what will happen if we need to give the display name, help/comment and description manually for all the tables. Its not just tables, but windows too. As of now, we are not doing that because, we have the application element that is created already for the ad_client_id column that does all these things.All these are possible only when the required application element is in your module or in any module that your module depends on. This can be set in the dependency tab of the module window.

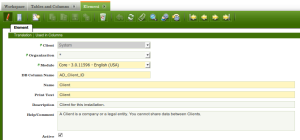
I have attached a screen shot where AD_Client column’s name is updated to ‘Client’ and description and help comment are added by itself. I have also attached the Application Element from which these comments are taken from.


Handling Application Element Properly:

1. Always use the common notation for column names that represents same meaning.
ie., Always remember to check whether we have any column that already have the same name. If exists, use the already existing one.
Eg: If the requirement is to create a field to store begin date, we can give the column name as begin_date, bgn_dt,begin_dt,etc.,  But we already have the column used in many places as begin_date. So use that.

2. Always use the meaningful notation for representing column names.
Eg: Though most people can understand begin_date,begin_dt,bgn_dt,bgn_date represents begin date, begin_date makes more sense.

3. Consider, you added a new column that is not present in the system.
Eg: previous_month
For this column, when you give synchronize terminology, the application element will be created as, Previous_Month. It will be displayed in the application element field in the columns as Previous_Month-Previous_Month.
1. Go to Application Dictionary -> Setup -> Element.
2. Search Previous_Month
3. Rename the Name field to Previous Month.
5. Give the description and Help/Comment
4. Rename the Name field to Previous Month in the column window also.

As you can see, you only need to rename the “name” field in column table. The help comment/Description would have been populated automatically. Thereafter the same name will be used when ever the same column name is used.

In Openbravo, if we have a wrong application element, no DAL related process, procedures, callouts, etc(EVERYTHING since openbravo is completely implementing DAL), will work. From a developer’s point of view, none of the efforts in writing any code is going to work with improper application element. I just wanted to stress out the need for better care towards it.